Athletic Mentors Success Story: Cheryl Riley

September 26th, 2019 by Athletic Mentors

What did you change?

I made a lifestyle change of what I eat and made it part of my regular routine to exercise. I try to eliminate processed food as much as I can. The majority of my diet is natural foods which consist of vegetables, fruit and lean meats. I don’t deprive myself from foods I love, but I use moderation. I am conscious of what I eat to feed my body the nutrition it needs. Read the rest of this entry »


Kickr “Climb” – Adjusting Difficulty Setting

September 24th, 2019 by JoAnn Cranson

By:  Todd Anthes

The subject of a prior blog discussed the benefits of the Wahoo Kickr Climb (the “Climb”) as aiding in the recovery of my back injury.  In short, the Climb adjusts to the gradient of a virtual hill by replacing your front wheel in a trainer setting. The default trainer difficulty setting of the Climb is 50% of the actual grade of the virtual hill.  I think the intent is to not have the device working more than necessary and to smooth out the virtual experience/ride. 

I primarily ride the Climb on Zwift.  All of the Zwift worlds have climbs of varying gradients.  The theory of the trainer difficulty setting is that a lower slope setting will reduce shifting and allow a rider to put more power out on the descents.  And while this makes sense to me, I fail to see why a rider wouldn’t want the actual slope setting. I didn’t give this much thought and was happy to have the forced position change which I think helps my back. 

When I start with new technology, I usually run everything “standard” until I am comfortable with it.  I am now comfortable with the Climb and have started to experiment with the trainer difficulty setting. I fail to see why a rider wouldn’t want the Climb to not simulate the actual slope regardless of trainer difficulty. And as previously mentioned, the two biggest selling points of the Climb for me are the reminder of the ergonomic simulation of body and bike position on gradients and increased rider feel for the indoor effort. 

am still playing with the trainer difficulty setting on my virtual rides, but this article (https://zwiftinsider.com/kickr-climb-trainer-difficulty/) has been essential in my experience with such settings. For example, I have a recurring workout that requires repeats of six minutes climbs at a specific power.  Given that I don’t have a six-minute climb near where I live, I often do this workout on my trainer.  I have been playing with the trainer difficulty setting on the Climb and it has positive impact on the workout. 

The jury is still out for me on what is the “best” trainer difficultly setting, but the referenced article is a great way to increase the viability of your trainer session. 

The post Kickr “Climb” – Adjusting Difficulty Setting appeared first on Team Athletic Mentors.


Six Mechanical Things to Check When Buying a Used Bike

September 20th, 2019 by JoAnn Cranson

By: Robert Munro

There are a lot of things to consider when buying a used bike. Fit and specs are undoubtedly important. However, this is a quick guide on what Mechanical Things to check for when buying a used bike. It is not a deal breaker if you find that one or more of these things is not up to your standard. What is important to realize is that these wear items cost money to rectify. You don’t want to spend $400 on a sweet new ride, only to have to take it to the shop for an equally expensive bill for maintenance and parts. Therefore, I have also included a rough estimate of what it cost to replace the part yourself and what it might cost at a shop (Don’t come crying to me when you have to pay $30 for a chain instead of $25, this is just an estimate).Chain ($25 DIY/$45 shop)

1. Making sure the chain is in good condition is important because it is indicative of other problems. Look for signs of rust. Mild rust can usually be cleared up with a healthy dose of lubricant but any more than that and I would replace it. See if the chain is especially grimy. Again, this one is usually not a bad deal but an exceptionally dirty chain can wear through a cassette quickly. 
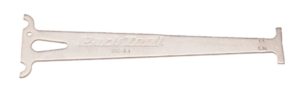
Finally, use a chain checker to see if it is stretched (~$11 on the internet or ask a friend if you can borrow theirs). If any of these problems are severe, pay close attention to the next one.                                                                         

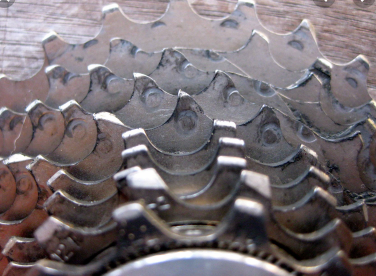
2. Cassette and Chain Rings (Cassette ($50 DIY/$80 shop), Chain rings ($150 DIY/$200 shop)!!!)

These get expensive fast! Don’t ask me why (look at your chain rings). Look for gouging on the “load” side of the teeth. This is the side that the chain makes hard contact with. Worn down teeth will impair shifting and even cause you to skip gears. (Not fun when sprinting out of the saddle).

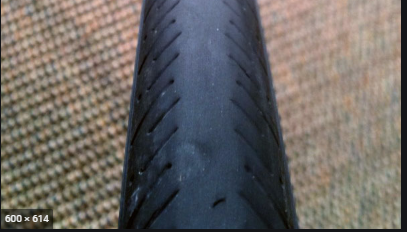
3. Tires ($100 DIY/$120 shop)

Look for a little indicator hole to show wear (for road). 
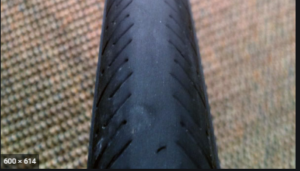
Look for squaring of the top of the profile. Finally, look for tiny cuts in the tread and sidewall. Good tires drastically improve your ride. In my opinion it is some of the best dollars spent on a bike. Don’t overlook it.

4. Cables/Housing ($25 DIY/$85 shop)

Pull both brakes and shift the bike when it is off the ground. Really pay attention to how easily the gears shift and the brakes feel. Also look at the exterior of the housing and where is enters and exits the frame. Cuts and fraying can be indicative of a poor running system.

5. Bar tape ($20 DIY/$40 shop)

One of the three contact points on the bike. There is no reason to neglect it. Don’t ride with old tape!!

6. Rotating stuff (bottom brackets and wheel hubs) ($Depends$)

Spin the cranks and wheels slowly to check for any grinding. You can also feel for this during your test ride. The other way to look for damage is to forcefully try to move the wheel or crank “Outward”. For the wheels, grab the top of the rim with one hand and the frame with the other. Then pull the wheel towards the frame. If you can wobble the wheel significantly on the bike, then the hubs may need an adjustment or replacement. All wheels will pull a little bit but if it pulls more than 1 cm (3/8”) then you may want to be concerned. The cranks can be tested in much the same way. Any movement sideways here is bad.

Some final thoughts:

First: TAKE YOUR TIME!! Don’t be in a rush. Check these things over slowly. Signs of damage often don’t pop out quickly. Look at every tooth, every inch of tire, and every link of chain. The seller won’t mind (assuming there is nothing to hide).

Second: Be respectful. Don’t berate the bike (or for goodness sake the seller). You may likely see this person again. The cycling community is small. The things you found are discussion points not evidence in a crime. These things will help with negotiations, but the seller does not have to adjust the price.

Happy Hunting!

The post Six Mechanical Things to Check When Buying a Used Bike appeared first on Team Athletic Mentors.


The Kickr “Climb” Helped My Recovery

September 16th, 2019 by JoAnn Cranson
By Todd Anthes I’m still recovering from a back injury and have had to examine a number of factors to help me get back on track and not exacerbate the injury while riding.  Oddly enough, one of items that has assisted is the Wahoo Kickr Climb (the “Climb”).  The Climb pairs with a Wahoo smart trainer (in place of your front wheel) and changes the gradient in conjunction with the hills on your virtual ride.  The default setting of the Climb is 50% of the actual gradient of the virtual hill. You can set the ratio to 1:1 (or another ratio), but this will be the subject of an entire blog itself.  After my injury I spent a lot of time on the trainer as I could control my environment. Put another way, I couldn’t fall and risk injury. However, one of the negative factors of spending a lot of time on the trainer is that I didn’t change my position much. As I would get bored on the trainer I would tend to slouch. This puts my back in a compromised position and certainly does not help in my recovery. You can read more here on getting help with injury related cases. It is no brainer that injuries can also take place due to accidents and it is best to hire experts In Riverside area based auto accident lawyers, in case you want legal assistance with the accident cases. In addition to a new fit, changing my saddle, and working on not slouching, the Climb was something I was very interested in trying as I thought it would force position changes on my saddle. The theory being that forcing a change in my position would not drivmyself into dysfunction.    I used the Climb for my entire 2018-2019 winter season, including many rides of 3 hours or more.  I’m pleased to report that the device has met its intended purpose. As the Climb adjusts to the gradient of the virtual hills, my position on the saddle also is forced to adjust. When the Climb adjusts to the gradient, it is also a great reminder to check my form. When it comes to accidents and other injuries, know what to do after an auto accident injury or the right kind of lawyer to hire for your case. I wholeheartedly endorse the Climb as a tool to enhance your training experience, as well as making longer trainer rides more tolerable. The forced change of your position on the saddle replicates the outdoor experience to a certain degree and can also serve as a reminder to pay attention to your form.   The post The Kickr “Climb” Helped My Recovery appeared first on Team Athletic Mentors.

Steelhead 70.3 vs Traverse City 70.3

September 13th, 2019 by JoAnn Cranson

By Dawn Hinz

Many athletes were excited when Ironman announced the Inaugural Half Iron Distance Triathlon in Traverse City. It’s a beautiful venue and popular tourist destination in Northern Michigan’s Lower Peninsula. However, Ironman already had a Half Iron Distance located in Michigan; Steelhead. Steelhead is held in the Southwest Corner of Michigan’s Lower Peninsula in Benton Harbor, Michigan. Steelhead is scheduled in late June and Traverse City is held in late August. How would these events be similar and how would they differ? Could an athlete do both?

Race Swim Swim Condition Bike Elevation Bike Road Condition Run Elevation Run Condition
Steelhead Lake Michigan Possibly Rough 1,306 Feet Good/

Some Hills

203 Feet Full Sun

3 Big Hills

Traverse City West Grand Traverse Bay More likely calm 2,455 Feet Nearly Perfect/ Very Hilly 314 Feet Partly Shaded

STEELHEAD SWIM EXIT

The SWIM-

Steelhead starts from the sandy beach of Jean Klock Park into Lake Michigan. Lake Michigan is one of the Great Lakes and shares more similarities with an ocean or the sea than it does an inland lake. Which means the swim can be unpredictable. It can be smooth or choppy. Sometimes the swim is cancelled due to large waves and strong currents. Then you run across the beach into transition.

Traverse City starts from Open Space Park into West Grand Traverse Bay. The Bay is actually a part of Lake Michigan. This means it could still be choppy but it is protected by land on three sides. Which means it’s more likely to have calm waters. However this is not guaranteed and you should still prepare for an “ocean water type swim”. You swim out a few hundred meters and then turn east; straight into the rising sun. You swim past a marina and exit at Clinch Park where you then run through a tunnel into transition.

The BIKE-

Steelhead’s bike course changed this year due to road closures. It’s an open course mostly along Blue Star Highway with some back country roads. Roads surfaces were mostly favorable with minimal fresh chip seal and only a few potholes to avoid. This course has a few rolling hills with 1306 feet of elevation gain. It’s a fast bike.

Traverse City’s bike course starts through Downtown Traverse City out to Sleeping Bear Dunes up the iconic M-22 Highway and back M-72 Highway. One lane is closed to vehicles in the direction you’re cycling. The first few miles is uphill and will probably be your slowest split of the bike but it gets fun after that. With hill after hill this course is anything but boring. It has 2,455 feet of elevation. You’ll want to practice going downhill as much as you practice going uphill. At mile 53 you start a nearly two mile decent before it flattens out down Grandview Parkway with the Bay along your left.

The RUN-

At Steelhead you’ll run two loops of a lollipop course around the Whirlpool Corporate campus park. There is very little shade or breeze. In full sun it was hot. There’s three decent sized hills and a total of 203 feet of elevation gain. The last 2.5 miles are downhill to the finisher’s chute.

Traverse City takes you through downtown out to Boardman Lake where you run along a path of paved surface and crushed gravel. There is actually a lot of shade on this course. You return back to the town with the finish line in view where you turn around for your second loop. Surprisingly there’s more elevation here at 314 feet of gain but there are no big hills and the last couple miles are flat.

My teammate – Kathy Braginton running at Traverse City

SPECTATORS And Crowd Support (Because it’s not all about the athlete)

At Steelhead family, friends and spectators can enjoy a day at the beach while occasionally checking back in to cheer on their athlete. There’s also a playground to help keep the little ones entertained. With one transition location they can see your swim, bike, run and finish without leaving Jean Klock Park. There’s food for sale at the beach or multiple restaurants a short drive away if they feel like leaving. If they don’t mind walking or biking a short ways they can cheer you on multiple times during the run.

At Traverse City the start is about a quarter mile walk from transition but there are many points where they can watch the swim and cheer you on as you leave the water. The crowd support as you start the bike and through the run was fantastic. There was a lot of energy and it helped keep athletes motivated. Spectators can find multiple restaurants to feast at while waiting for their athlete. Many children were entertained at a splash pad and park. Overall I feel spectators get to view more of the race in Traverse City but it was more crowded since this race sold out.


Teammates make racing anywhere more fun!

DECISION TIME-

Which race is right for you depends on your strengths, weaknesses and goals for your race day. I found more satisfaction at the finish line of Traverse City because it was a more challenging race but it was not a personal record. The faster of the two courses is Steelhead.

With two months between races you might not have to choose; you could do both.

The post Steelhead 70.3 vs Traverse City 70.3 appeared first on Team Athletic Mentors.


Thinking About Buying a Bike? Here are 5 Reasons you SHOULD!

September 7th, 2019 by JoAnn Cranson

By Erin Young

1.Cycling decreases stress

Do not underestimate the power of nature and green spaces to change your mood and general health. The environment around you has a huge impact on how you perceive the world and how you feel on any given day. In the midst of the hustle and bustle of the city, you may feel overwhelmed, stressed and hurried. Once you hit the trails, and immerse yourself in a forest or natural landscape, studies have shown that stress levels are reduced, blood pressure decreases and your overall well-being increases. Don’t believe it? Compare your body’s reaction when biking in the city vs. biking through the forest.

2. Biking is easy on your joints

If you have bad knees or hips, biking can offer great exercise, while having minimal impact on your joints. Running can often be a difficult sport to start and some of us may have past injuries that make it hard on the body, but biking is much easier on your body.

3. Mountain Biking encourages you to live in the moment

Mountain bikers are great yogis. It’s hard to think about anything else but biking when you’re hopping over logs, riding through streams and around tight corners with trees on either side. You have to be focused on riding, be in the moment to avoid injuries and get the most out of the experience. You will forget about doing your taxes, your annoying boss or recent troubles – and instead, release loads of happy endorphins that will have you smiling from ear to ear.

4. Biking makes for a healthy heart

Biking will get your heart pumping. Steep climbs will challenge your cardiovascular strength and over time your heart will become stronger. The recovery period for those climbs will decrease and you will find it easier to accomplish longer and more challenging rides.

5. Biking encourages social connections

I recently watched a TED Talk by Harvard researcher Robert Waldringer, entitled “What Makes a Good Life? Lessons From The Longest Study on Happiness” – want to know the secret to a good life? According to Robert’s study it’s high quality social relationships. The closer you are with friends and family, the happier you will be in the long run. So, what does this have to do with biking? EVERYTHING. Mountain biking encourages trailside chats with bike buddies and post-ride hang-outs to debrief the ride and talk about life. Biking brings people together, to teach each other new skills, learn from others and create memorable experiences in beautiful places.

Want to give group rides a try? Check out the Kalamazoo Bike Club. They have group ride locations and times listed on their website. Most cities have bicycle clubs that are warm and welcoming to all riding abilities, especially new cyclists. All you need are two wheels and a helmet! Visit Pedal in Kalamazoo for all of your cycling needs and Custer Cyclery if you are in the market for a mountain bike experience.


The post Thinking About Buying a Bike? Here are 5 Reasons you SHOULD! appeared first on Team Athletic Mentors.


Stressed out? Get Moving!

August 27th, 2019 by JoAnn Cranson

By JoAnn Cranson

I’m getting that overwhelming feeling and I can feel the chronic stress and anxiety flooding into my body. Then my brain feeds on the total lack of control I feel with the stress. All the self-talk that I do does not convince my brain to let go of it. Sometimes it just seems circumstances build up including the unexpected death of a loved one, separation/divorce, family problems, health issues, financial difficulties and job challenges to name a few.

2019 has been a rough year for me and I’m left with how can I handle this? It’s so easy to fall into a depression and lack of motivation when that is the last thing I should be doing!

It’s time to get up and do something. Even days I don’t “feel” like exercising, once I put the effort in I can’t believe how much better I feel. My mind is clearer, my brain has had a break from thinking and I feel accomplished.

I started to read about some research that has been done. I was surprised to learn from the American Psychological Association that 75% of people in the US feel stressed out. The other two big issues that are contributing factors are unhealthy eating and lack of sleep. This, in turn, leads to one in three having depression.

As if that isn’t enough, when we are stressed our body creates extra of the hormone cortisol, which causes us to store more abdominal fat over time. Another doctor stated that stress is associated with just about every chronic disease we know.

All my self talk of trying to get my brain to think of other things, looking for distractions, or take a relaxing bath, but nothing works as well as exercising.

In more of my reading there is so many bonuses to exercising for my overall health. It’s the natural medicine that fights against many challenges we face every day. Through regular exercise it helps build up a resistance to stress. Cardiovascular workouts help the heart pump more blood to the brain which in turn is feeding our brain cells. There are even some studies that show as we age brain cells die off but now they are showing that exercise leads to preserving and making new cells.

Make the time and effort to find a form of exercise that you can enjoy and aim for 1½ to 3 hours per week. Start out slow, do the best you can, form a routine. Exercise is not the cure all for stress and anxiety, but it’s a piece of the puzzle that is helping me deal with the challenges of life.

The post Stressed out? Get Moving! appeared first on Team Athletic Mentors.


Tips for Warming up for a Triathlon

August 8th, 2019 by JoAnn Cranson

By Brian Reynolds

Have you ever wondered how to warm up for a triathlon race?  I don’t know about you but when I first got into triathlons this is something I wondered about.  I come from a running background and warming up for a race was pretty straight forward. My warm up was usually a 10 to 15 minute run followed by some form drills (i.e., high knees or butt kicks) and pick ups (i.e., strides or fartleks).  However for a triathlon there are 3 sports. Do you run, bike, and swim for 10-15 min for each discipline? What order should you do the warm up? Should I bike first or should I run first?  I’ll share with you what warm up routines have worked for me.

One item to note is that no matter the triathlon distance you should do some type of warm up.  How you warm up will greatly depend on the event’s distance and weather conditions. In general the shorter the race distance the longer the warm up.  Thus the longer the race distance the shorter the warm up. Short distance races such as a sprint triathlon are very high intensity (aka your heart rate is going to be really high!).  Your body needs to be warmed up so you can go full throttle at the start. A proper warm up will elevate your heart rate and will dilate your veins to allow more blood flow (oxygen) to the working muscles.  Long distance races such as the Ironman distance is a low-moderate intensity which doesn’t require a long warm up to get your body ready to race comfortably at this intensity. Your working muscles will not require as much oxygen at a low-moderate intensity so you can get by with very little warm up.

Weather conditions will play a big role during your warm up.  If it’s cold outside it’s important to wear warm clothes to keep the muscles warm and it may be necessary to do a longer warm up.  If it’s hot outside it’s ok to warm up in just your racing outfit to help stay cool. It may be necessary to shorten the warm up if it’s really hot to help prevent your body from overheating.

Below are general guidelines on warming up for the different triathlon distances.

Sprint:

  1. 10 – 15 min run.  Include some race efforts last 5 mins.  After your run do some dynamic stretching.

  2. Running form drills and pick-ups which are faster than race pace.

  3. 10 – 15 min swim.  Second half of swim should include several strong efforts at race pace or faster.  Note: If you’re not able to get in the water before the race then warm up with stretch cords.

Olympic:

  1. 10 – 15 min run.  Include some race efforts last 5 mins.  After run do some dynamic stretching.

  2. Optional: Do some run form drills and pick-ups which are faster than race pace.

  3. 10 – 15 min swim.  Second half of swim should include several strong efforts at race pace or faster.  Note: If you’re not able to get in the water before the race then warm up with stretch cords.

Half Iron Distance:

  1. Optional: 5 min easy run

  2. 5 – 15 min swim.  Second half of swim should include several strong efforts at race pace or faster.  Note: If you’re not able to get in the water before the race then warm up with stretch cords.

Full Iron Distance:

  1. 5 – 10 min easy swim with a few strong efforts towards the end.  Note: If you’re not able to get in the water before the race then warm up with stretch cords.

You’ll notice that there is no bike warm up because it’s hard to get a ride in before the race.  In addition it’s dark early morning which is not safe to ride the bike around unless you have a stationary trainer.  Besides the run will help warm up your biking legs so don’t stress out by needing to get a ride in.

Another important thing to note is to make sure you do the swim warm up last.  The race starts with the swim so you want your arms warmed up shortly before the race.  Ideally you want to finish the swim warm up 5 – 10 mins before the race. Sometimes this is not possible so it’s ok if you need to finish your warm up early.

If you do not have to time to get in a complete warm up then skip or shorten the run.  At least do some dynamic stretches and form drills to wake up the legs. In my opinion the highest priority is the swim during the warm up because you want to be comfortable and loose in the water before the race.  This is beneficial if you are on the fence of wearing a thermal cap or not. You can at least try it out in the water during your warm up.

I hope these warm up tips help!

The post Tips for Warming up for a Triathlon appeared first on Team Athletic Mentors.